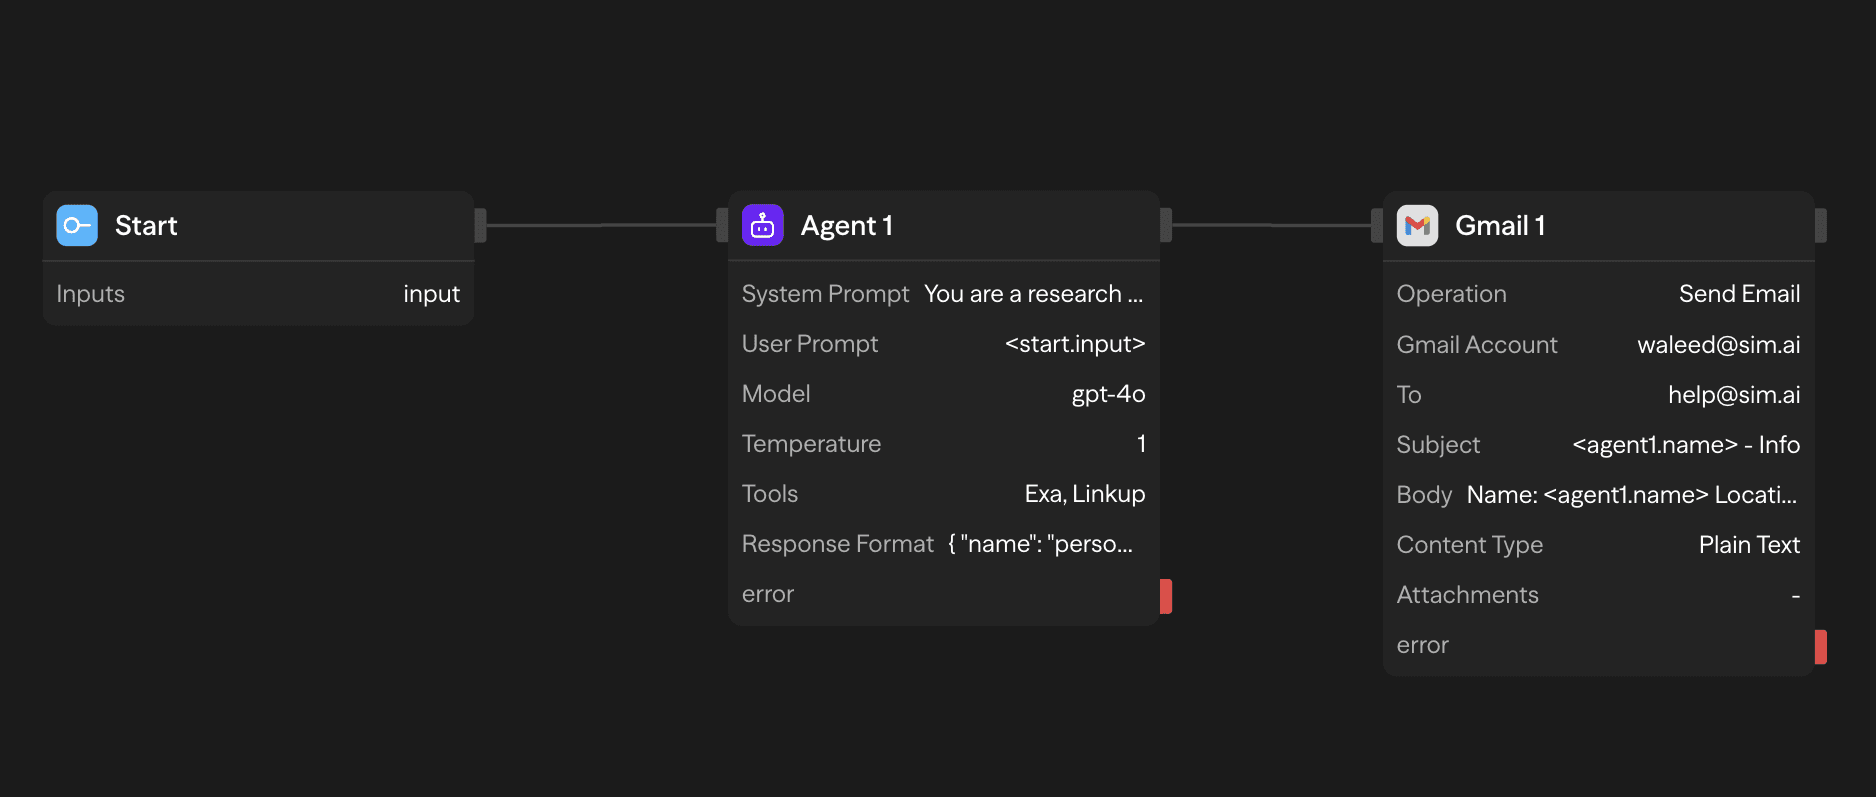
Build your first AI workflow in 10 minutes. In this tutorial, you'll create a people research agent that uses advanced LLM-powered search tools to extract and structure information about individuals.
What You'll Build
A people research agent that:
- Accepts user input through a chat interface
- Searches the web using AI-powered tools (Exa and Linkup)
- Extracts and structures information about individuals
- Returns formatted JSON data with location, profession, and education
Step-by-Step Tutorial
SteelEngine accounts are created by invitation. Open the invitation email, create your account from its link with the address it was sent to, and accept. You land in the workspace you were invited to:
/<org-slug>/<workspace-slug>/homeOn a new self-hosted install with no accounts yet, the first person signs up at /signup without an invitation and becomes the first admin, then invites everyone else.
If you reach the app without belonging to any organization, and the app has no invitation to send you to, SteelEngine creates a personal organization for you with a default workspace inside it instead. The first admin of a new install lands here. Its org slug is generated from a curated word-pair list (e.g. mild-owl); the workspace slug is a short random string. You don't have to name anything to get started — but if you want to, click the workspace name at the top of the sidebar (or press Mod + O) to open the workspace switcher, where you can create another workspace or invite teammates. To rename a workspace, right-click it in the switcher and choose Rename. To rename the organization, open Organization Settings → General.
See Organizations and Workspaces for the full slug rules and what changes when you upgrade to a team plan.
Click New workflow (the + button in the sidebar's Workflows header) and name it "Getting Started".
New workflows use platform execution defaults. If your workflow needs a specific time limit, right-click it in the sidebar and choose Execution timeout. Enter seconds, or leave it blank for the default. See Workflow Timeouts for how waits and approvals count.
Every new workflow includes a Start block by default—this is the entry point that receives user input. Since we'll trigger this workflow via chat, no configuration is needed for the Start block.
Drag an Agent Block onto the canvas from the Toolbar tab of the panel on the right and configure it:
- Model: Select an OpenAI model such as GPT-4o
- System Prompt: "You are a people research agent. When given a person's name, use your available search tools to find comprehensive information about them including their location, profession, educational background, and other relevant details."
- User Prompt: Drag the connection from the Start block's output into this field to connect
<start.input>to the user prompt
Enhance your agent with web search capabilities. Click on the Agent block to select it.
In the Tools section:
- Click the Add tool... field
- Select Exa and Linkup from the available tools
- Provide your API keys for both tools to enable web search and data access
Test your workflow using the Chat panel, the floating panel that opens over the right side of the canvas. If it is not open, right-click the canvas and choose Open Chat. This panel runs the workflow you are building. It is not the Assistant tab in the side panel.
In the chat panel:
- Click the Outputs dropdown and select
agent1.contentto view the agent's output - Enter a test message: "John is a software engineer from San Francisco who studied Computer Science at Stanford University."
- Click Send to execute the workflow
The agent will analyze the person and return structured information.
Configure your agent to return structured JSON data. Click on the Agent block to select it.
In the Response Format section:
- Click the magic wand icon (✨) next to the schema field
- Enter the prompt: "create a schema named person, that contains location, profession, and education"
- The AI will automatically generate the JSON schema
Return to the Chat panel to test the structured response format.
With the response format configured, new output options are now available:
- Click the Outputs dropdown and select the structured output option (the schema you just created)
- Enter a test message: "Sarah is a marketing manager from New York who has an MBA from Harvard Business School."
- Click Send to execute the workflow
The agent will now return structured JSON output with the person's information organized into location, profession, and education fields.
What You've Built
You've successfully created an AI workflow that:
- ✅ Accepts user input through a chat interface
- ✅ Processes unstructured text using AI
- ✅ Integrates external search tools (Exa and Linkup)
- ✅ Returns structured JSON data with AI-generated schemas
- ✅ Demonstrates real-time testing and iteration
- ✅ Showcases the power of visual, no-code development
Key Concepts You Learned
Block Types Used
Core Workflow Concepts
Data Flow
Connect blocks by dragging connections to pass data between workflow steps
Chat Interface
Test workflows in real-time with the chat panel and select different output options
Tool Integration
Extend agent capabilities by integrating external services like Exa and Linkup
Variable References
Access block outputs using the <blockName.output> syntax
Structured Output
Define JSON schemas to ensure consistent, formatted responses from AI
AI-Generated Schemas
Use the magic wand (✨) to generate schemas from natural language prompts
Iterative Development
Build, test, and refine workflows quickly with immediate feedback
Next Steps
Explore Workflow Blocks
Discover API, Function, Condition, and other workflow blocks
Browse Integrations
Connect 180+ services including Gmail, Slack, Notion, and more
Add Custom Logic
Write custom functions for advanced data processing
Deploy Your Workflow
Make your workflow accessible via REST API or webhooks
Build a Frontend
Export your deployed workflows into a Next.js frontend launch kit
Resources
Need detailed explanations? Visit the Blocks documentation for comprehensive guides on each component.
Looking for integrations? Explore the Tools documentation to discover 1,000+ tools and integrations.
Ready to go live? Learn about Execution and Deployment to make your workflows production-ready.
Want a guided course? Take SteelEngine Foundations, a six-module Academy course (about 75 minutes). It has hands-on exercises on the canvas and a certificate at the end.